Resources
How to join a textile conveyor belt? Brief guide to splicing for sectors such as cement, mining, and food processing.
Did you know that the splicing method you choose for your conveyor belts can make a difference in the lifespan, safety, and efficiency of your operation?
In demanding sectors like mining, cement, and food, where continuity and resistance are key, choosing the right splice is essential to minimize downtime and maximize productivity.
What is a conveyor belt splice?
A conveyor belt splice is the process of joining two ends of a belt to form a continuous loop, which is essential for ensuring the efficient transportation of materials in industrial facilities. It can be performed either on-site or in a workshop, depending on the length and environmental conditions.
Main splicing methods
- Mechanical splices: They are a quick and practical solution, especially useful when space is limited or the belt tension is low. They can be made straight or at an angle (recommended, usually at 17º), which improves resistance and the gradual contact with pulleys. Different models of clamps exist, and their installation must always follow the manufacturer’s instructions.
- Cold vulcanized splices: They use an adhesive made of liquid rubber and a hardener, achieving strong and resistant bonds. The execution is simpler than hot vulcanization, and their resistance is sufficient for many industrial applications.
- Hot vulcanized splices: They offer maximum strength, durability, and smooth operation. They require splicing presses that exceed the length and width of the belt, and the materials must be compatible with the belt itself. Different formats exist: stepped (the most common), finger, overlapped, or with insertion strips.
Steps for making a splice:
- Measure the useful length of the belt with precision, including the splice step.
- Cut the ends at an angle of approximately 17º (0.3 times the belt’s width).
- Mark the cut on the covers with the same inclination and at the distance of the stepped end.
- Remove the cover rubbers in the stepped area.
- Remove the successive canvases, leaving a stepped junction between them. The first and last canvas on each end must be cut to 20 mm from the rubber.
- Glue the stepped canvases with the appropriate solvent according to the rubber type.
- Cut the edges of the cover rubbers at a 45º bevel.
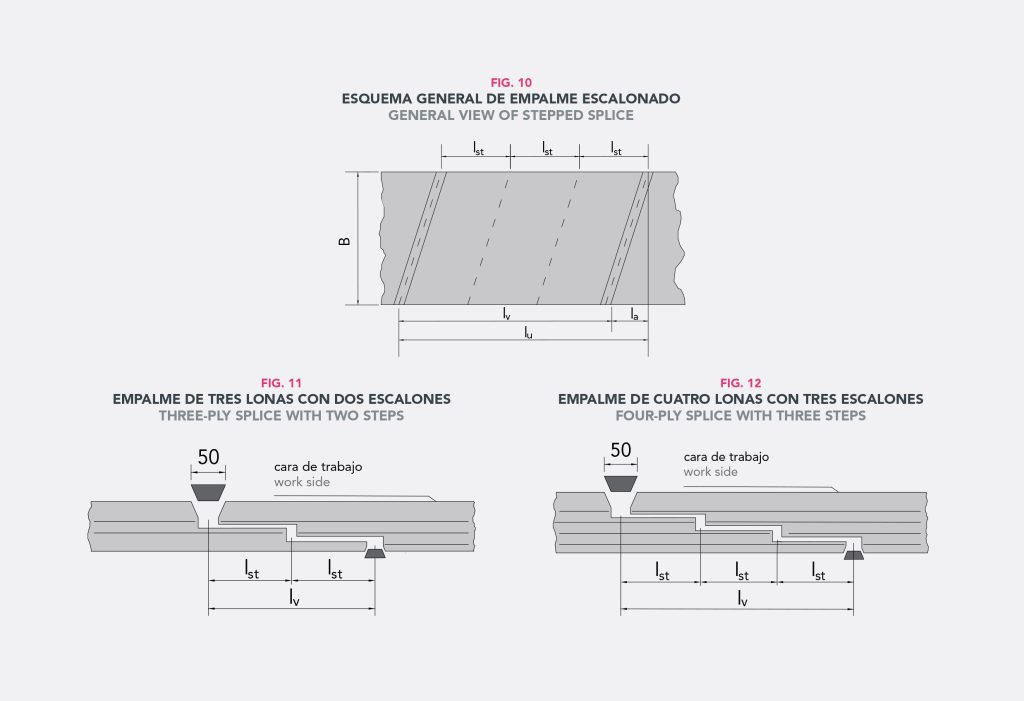
- Assemble both parts following the diagrams, placing a calendered canvas strip and raw rubber at the joints.
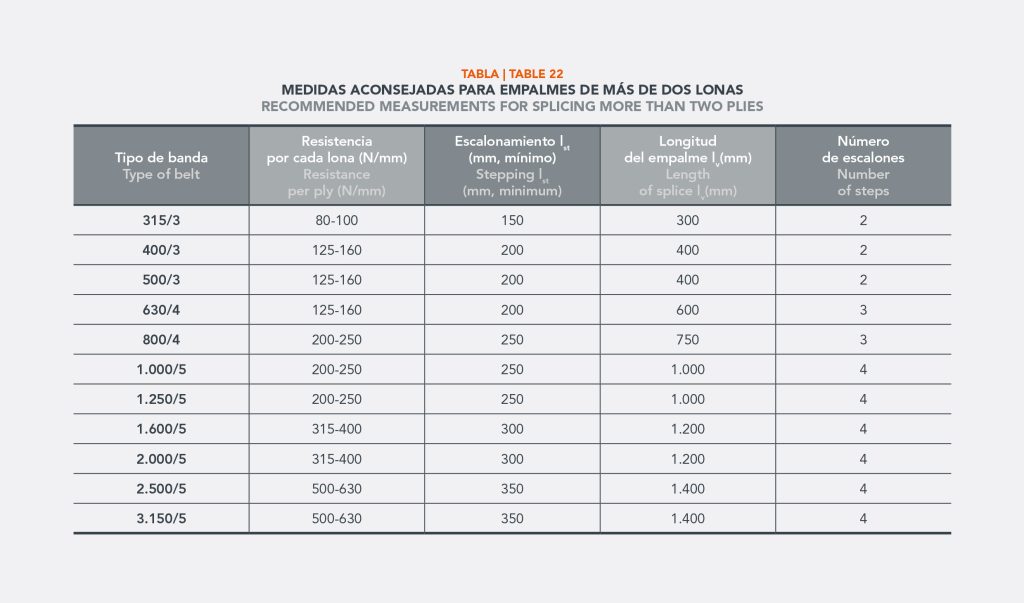
The splice is normally made by stepping the plies (see figure), where:
B = Belt width
lst = Step length per ply (see table below)
la = Belt cut advance. Normally = 0.3 · B. In some cases, la = 0
n = Number of plies
lv = Splice length
Total length = lst · (n-1) + la